 25.04.2012, 03:18
|
#1 |
|
Участник
|
dynamicsaxtraining: Sales
Источник: http://www.dynamicsaxtraining.com/fi...training/sales
============== Hi! In this training lesson, we will study in detail the sales process, sales taxes, posting results, prepayment, payment, bank reconciliation, collection letters, and interests. Let’s begin. The company business cycle can be described in the following way: 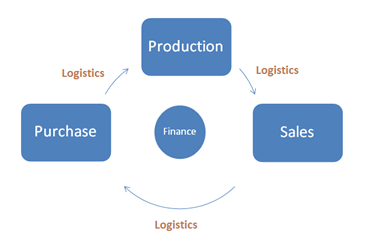 Business cycle Business cycleWhat is the first step in this cycle? As you may know, the first step in business is finding a Customer and signing a contract. A lot of companies are launched after the Customer is found and the contract is signed. So, the first step in the business cycle is Sales, all other steps serve the Sales step. The flow of the sales process is similar to the purchase flow:
We assume that the Sales Manager finds the Customer who wants to buy 10 items of 1003 (Plasma Television Model 01) for the price of $ 1 600. Let’s go through the sales steps and analyze the results. Quotation First of all, the Sales Manager finds the Customer. There are a lot of techniques to do this: exhibition, e-mail spam, advertisements, etc. For this purposes Microsoft Dynamics AX provides a separate CRM module. CRM is an abbreviation for client relationship management. If you open the CRM module in Microsoft Dynamics AX, you can find the Sales quotation form. A Sales quotation is created when the Sales Manager makes a proposal to the business relation (a possible customer). The sales quotation can either be canceled or confirmed. A Quotation is used to record the possible Sales order and the Customer. If the sales quotation is confirmed, the sales order is created on basis of the confirmed quotation and the customer record is created on basis of the business relation. The Quotation confirmation step is used to record in the system that the customer agrees to make an order. The quotation step is optional. The Sales Manager can create the sales order without the quotation. The Quotation step does not generate any financial transaction. To create a sales quotation, do the following:
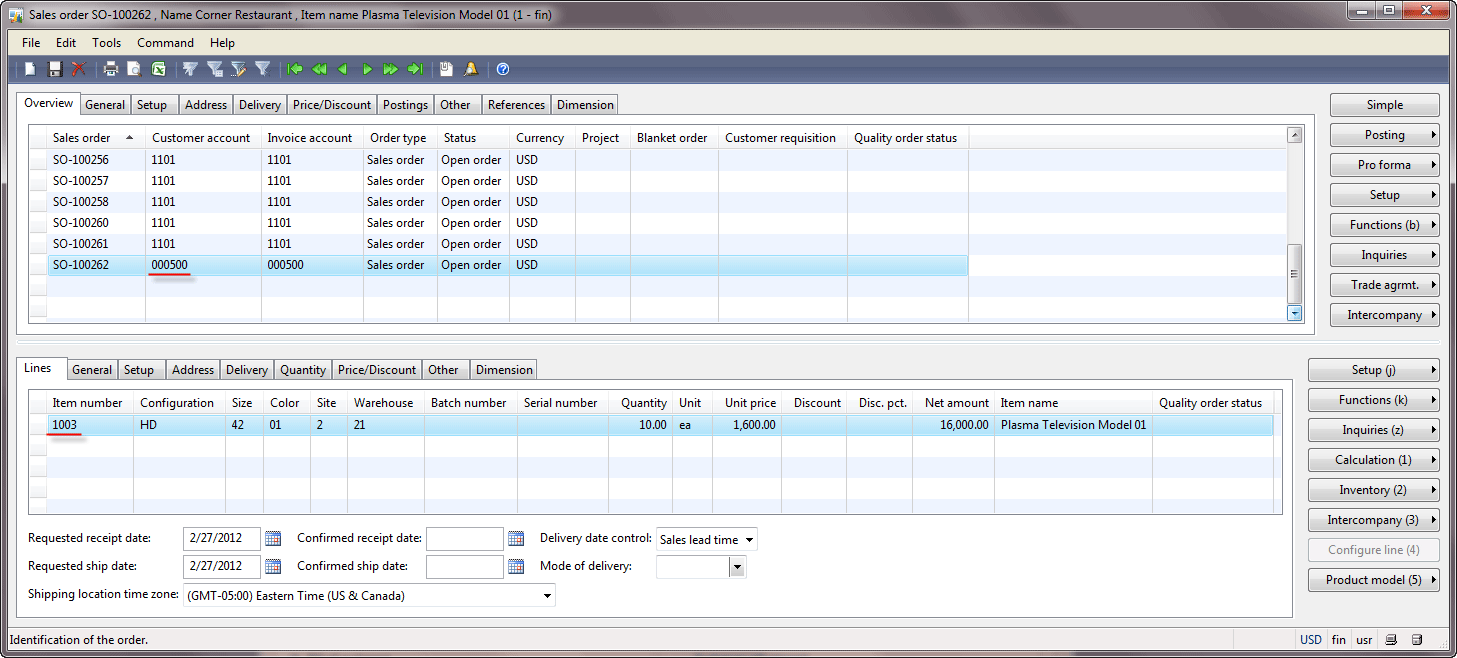
 Note that the Site, Warehouse, Unit, and Unit price fields are automatically filled in. The values for the Site, Warehouse, and Unit fields are filled in by analogy with the purchase line. In the purchase lesson you can find how the values are filled out. The Unit price field contains the value of 1600. How does Microsoft Dynamics AX know the price? If we go to the Items form under Inventory management > Common Forms > Item details > find the 1003 item > Price/Discount tab > Base sales price field group, we see that the sales price is zero. If we go to the Item dimension combination form (the Items form > find 1003 item > Setup menu button > Item dimensions combination button > find the line with Configuration = HD, Size = 42, and Color = 01 > Price button), we see that only the cost price is set up. The sales price is taken from the trade agreement (the Items form > find the 1003 item > Trade agrmt. menu button > Sales price button). The Price (sales) form opens. We can see that the price for our configuration is $1600. 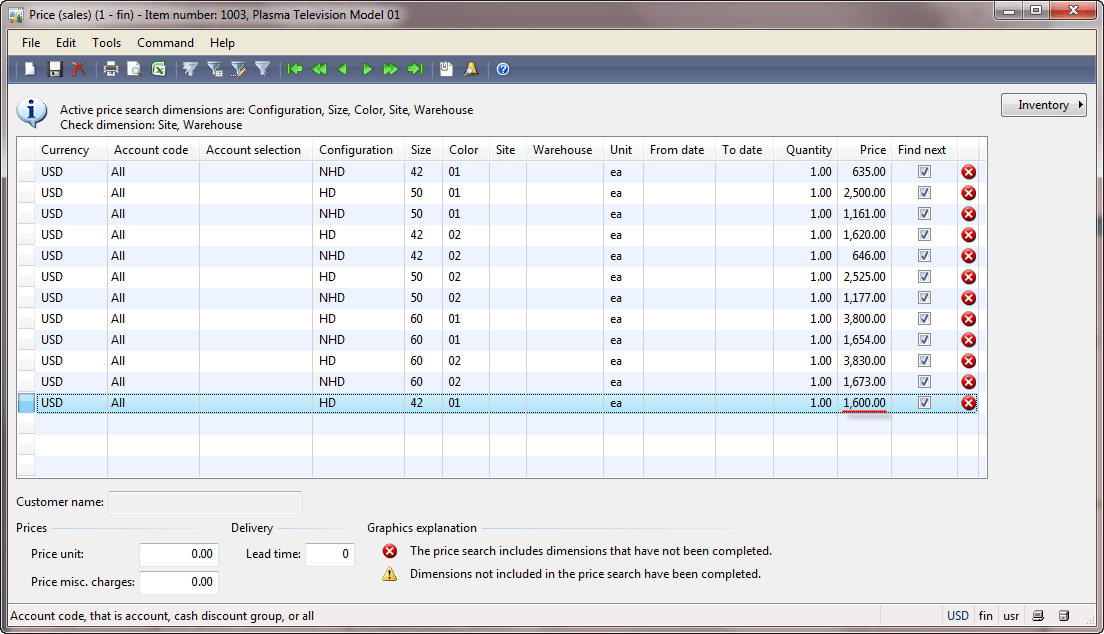 Confirm the sales quotation taking the following:
 In the Sales order form, go to the Delivery tab and fill in the Mode of delivery field with, for example, the “10″ value (Truck delivery). In this training lesson, you can get more information about the item delivery. The Update order lines box appears, select the Update Mode of delivery check box and click OK. Let’s check the confirmation quotation posting results. In the Sales order form, click the Inquiries > Quotation confirmation button. Click the Inquiries > Quotation confirmation button again. The Confirmation journal form opens. 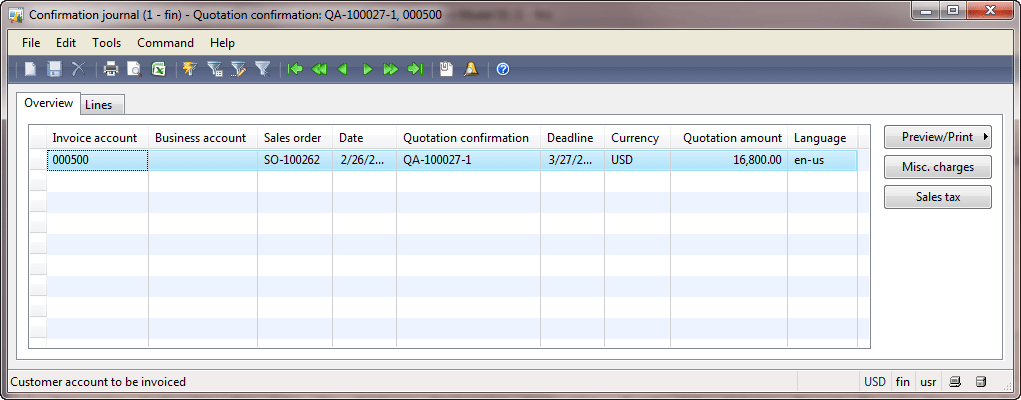 We can see that the new journal has been created with one line. This step has no influence on accounts, because from the financial point of view nothing has changed. No general ledger or sub-ledger transactions have been created. The Confirmation journal form doesn’t have the Voucher button. As you remember a voucher is used to group all transactions generated for one operation. Since the Confirmation journal form doesn’t have the Voucher button, the quotation confirmation operation never generates transactions. Note that the quotation amount is $16 800. It is because sales taxes have been added. We will understand how sales taxes are set up and calculated later in this training. Confirmation The confirmation step is similar to the quotation confirmation step. It is optional and can be omitted. The confirmation step is used to record in the system that the customer receives the sales order document and confirms its details (quantity, configuration, price, delivery terms, payment terms, etc.). The Sales Manager clicks the Posting > Confirmation button in the Sales order form. The Posting confirmation form opens. Select the Print confirmation check box. To print the confirmation to the screen, click the Printer setup > Confirmation button and select the Screen option, click OK. In the Posting confirmation form, click OK. The Confirmation document is printed. The Sales Manager sends this document to the customer. If the customer asks to change some details, this step can be repeated. To view the posting results, click the Inquiries > Confirmation button in the Sales order form. The Confirmation journal form opens. 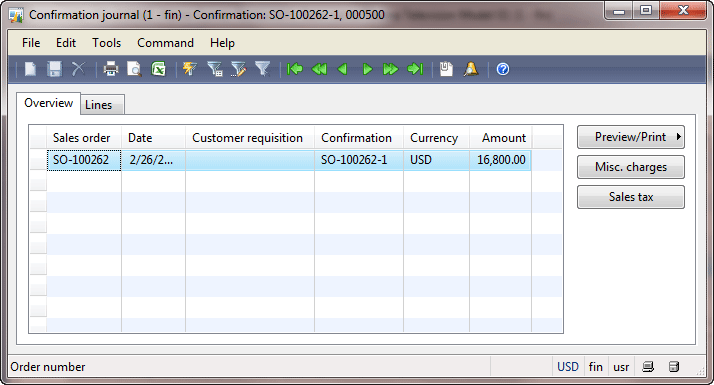 We can see that the journal has been created. The confirmation step has no influence on accounts, because from the financial point of view nothing has changed. The Confirmation journal form doesn’t have the Voucher button. The confirmation operation never generates transactions. Picking and Shipment Now, the items should go through the following process:
The flow of picking and shipment steps depend on the item setup. In our case, the flow is the following:
The comprehensive flow (with transporting the items to the outbound location, loading them into the truck, and shipping them) depends of the following parameters:
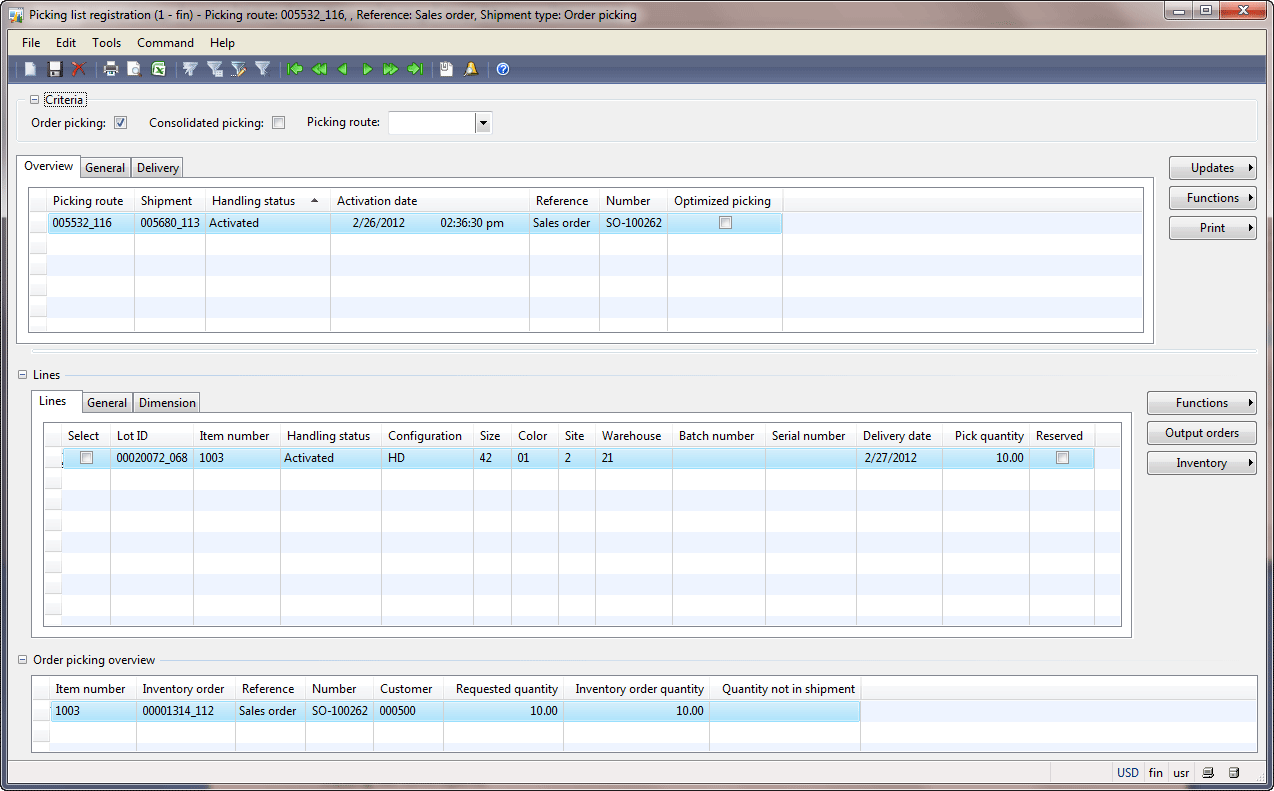
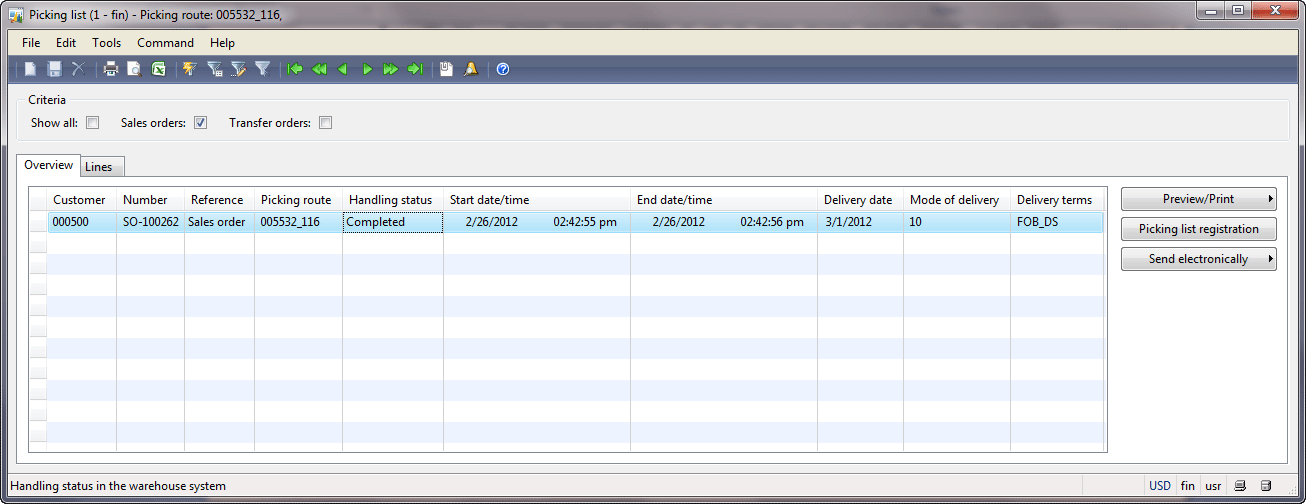 We can see that a new journal has been created. This step has no influence on the company accounts, because from the financial point of view, nothing has changed. The Picking list form doesn’t have the Voucher button. The Picking list operation never generates transactions. Note that neither the journal header nor the lines have information about the prices (the item price or the total order price). It is because this step is not related to the financial one. The company hides some info (the prices and the customer information) from the Warehouse Workers. Packing Slip This step is similar to the Packing slip step in the purchase process. A packing slip document is a guarantee that the customer receives the items. This step is used to record in the system that the item was delivered to the customer and the customer confirms all details (no items have been broken, the item quantity and configuration are the same, etc.). Note that in this step the customer does not confirm paying for delivered items. The company can create a separate general ledger account for the items to be delivered to the customer, but for those that were not yet invoiced. In this case, the general ledger and the item transaction are generated. But this is an optional step. The general ledger transactions are generated if the Post physical inventory check box is selected in the item’s inventory model. Find the inventory model group for the 1003 item (Inventory management > Common Forms > Item Details > find 1003 item > General tab > Groups field group > Inventory model group field). The 1003 item has the “Std Cost” inventory model group. Find the configuration of the “Std Cost” inventory model group under Inventory management > Setup > Inventory > Inventory model groups > find “Std Cost” > Setup tab > Ledger integration field group > Post physical inventory check box. We can see that for the 1003 item, the packing slip step generates general ledger transactions. 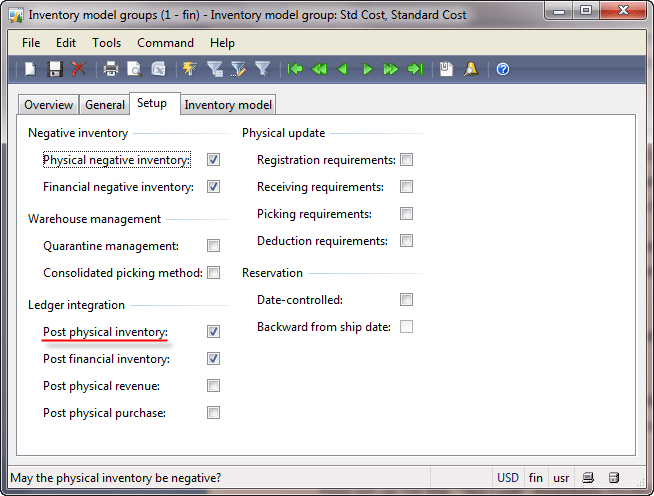 The transaction will look as follows: Accounts receivable (un-invoiced)Inventory (un-invoiced)DebitCreditDebitCredit$12 300$12 300 Note that the amount used for this transaction is $12 300, not $16 800. The Inventory account contains the cost of items in stock. Since the items are delivered to the customer, the total cost of items in stock is decreased. From the purchase training lesson, we can find that the item cost is $12 300. On the other hand, the customer receives the item, so the cost of the item is recorded to the Account receivable account. This step is used to record that the item was delivered to the customer, so the item cost is used. When the customer agrees to pay for the delivered items, the item price is used (it is the Invoice step). Account receivable is the company asset. Account receivable is increased, so the debit part is used. In other words, when the debit part is used, it is “good” for the company. Inventory is also the company asset. Inventory is decreased, so the credit part is used. In other words, when the credit part is used, it is “bad” for the company. Let’s post the packing slip and check the results. In the Sales order form, click the Posting > Packing slip button. The Posting packing slip form opens. Note that you can print the packing slip document to the Screen by selecting the Print packing slip check box, clicking the Printer setup > Packing slip button, selecting Screen, and clicking OK. Click OK. The packing slip document is printed to the screen. Note that this document doesn’t have the item price. It contains information about the item configuration and quantity. Let’s check the posting results. In the Sales order form, click the Inquiries > Packing slip button. The Packing slip journal form opens. We can see that the journal has been created. 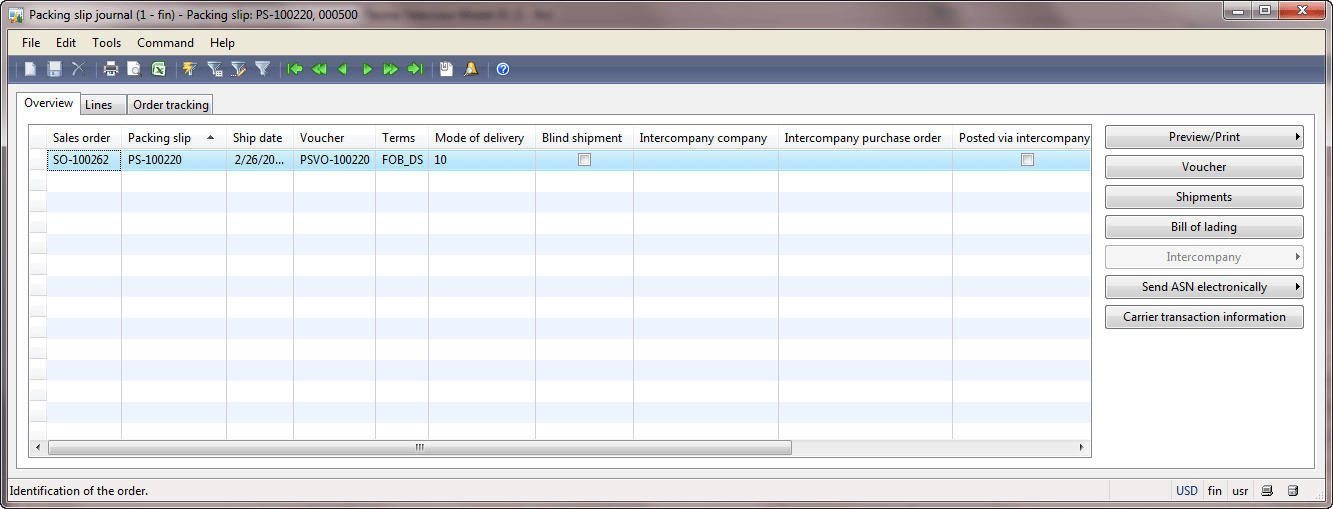 The Packing slip journal form has the Voucher button. So, this step can generate the general ledger transactions. The voucher is used to group all transactions that were generated. Click the Voucher button. The Voucher transactions form opens. We can see that the transactions have been generated. Find the information about these accounts. Go to General ledger > Common Forms > Chart of Account Details. The Chart of accounts form opens. Find the 142300 account. This account has the “Inventory Clearing – Shipped, un-invoiced” name and belongs to the Inventory accounts. Find the 130300 account. This account has the “Accounts Receivable – Clearing” name and belongs to the Accounts Receivable accounts. In Microsoft Dynamics AX, negative amount is used to show that it is the credit part, and the positive amount is used to show that it is the debit part. So, we make sure that the generated transaction looks as follows: 130300 (Accounts receivable, un-invoiced)142300 (Inventory, un-invoiced)DebitCreditDebitCredit$12 300$12 300 Let’s check all transactions that were generated for all ledgers. In the Voucher transactions form, click the Origin button. The Transaction origin form opens. We can see that except the ledger transactions, an inventory transaction has also been generated. Why does Microsoft Dynamics AX use the 130300 account as Account receivable un-invoiced and the 142300 account as Inventory un-invoiced? Microsoft Dynamics AX takes accounts for different operations from the posting profiles. Posting profiles are used to set up the controlling account (the general ledger account) for specific entities: customer, vendor, and item. Since the packing slip operation relates to the item delivery, only an inventory transaction is generated (except the general ledger transactions). Controlling accounts for the customer un-invoiced and inventory un-invoiced are set up in the inventory posting profiles. Let’s find out to what item group the 1003 item belongs. Open the Items form (Inventory management > Common Forms > Item details > find 1003 item > Item group field). The 1003 item belongs to the “Television” item group. Open the items posting profiles form. Go to Inventory management > Setup > Posting > Posting. The Inventory posting form opens. The Sales order tab is shown by default. The Packing slip radio button is also selected by default. Find the settings for the “Television” item group. 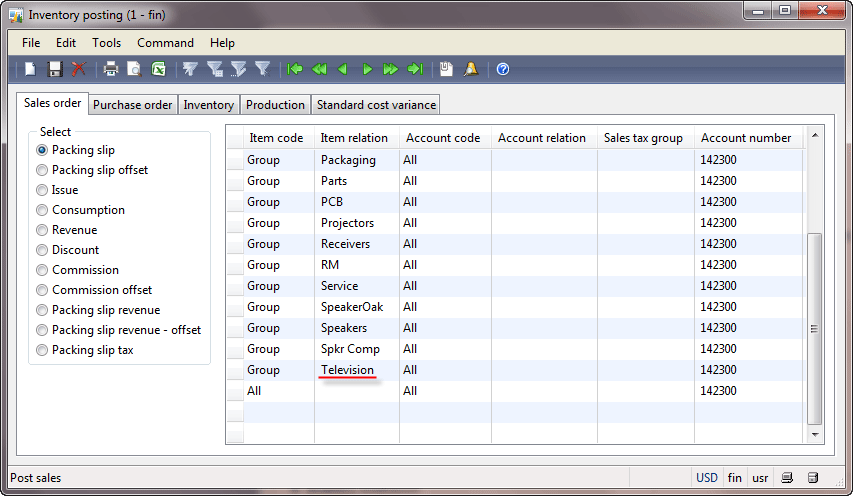 This configuration is used for the Inventory un-invoiced accounts. We can see that for the 1003 item, the 142300 general ledger account is used as Inventory, un-invoiced. Select the Packing slip offset radio button. Find the settings for the “Television” item group. The Inventory posting profile form looks as follows: 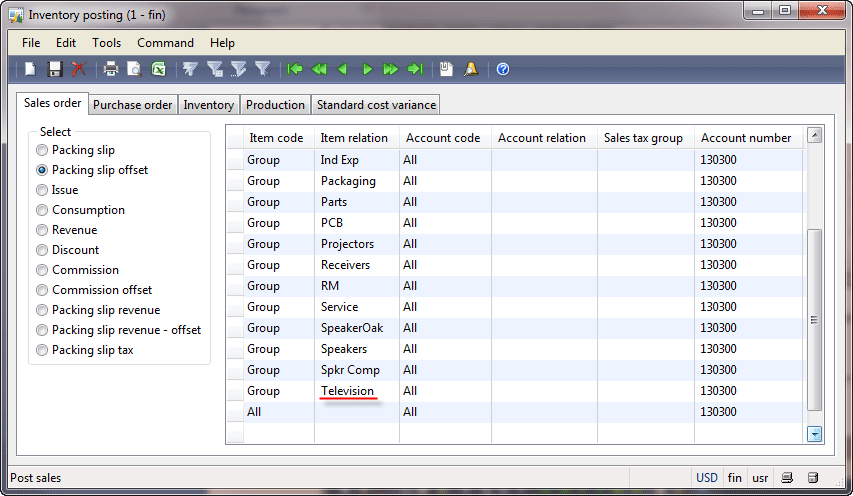 This setup is used for Account receivable, un-invoiced accounts. We can see that for the 1003 item, the 130300 general ledger account is used as Account receivable, un-invoiced. Invoice The Invoice is the last and the main step in the sales process. The company can set up the sales flow with only one Invoice step. In this case, all previous steps (Quotation, Confirmation, Picking, Packing slip) are optional and can be omitted. The Invoice step is used to record in the system that the customer receives the Invoice document and confirms to pay for delivered goods. …  You are not authorized to see the full training lesson (67 pages are hidden). Download the full PDF version of the Financial training for Dynamics AX 2009. … We can see that except the ledger transactions, the customer transaction is created. This is the open customer transaction that should be settled with the customer payment transaction. The customer payment transaction will be created when the customer pays the interest (the Account Manager will use a payment journal to post the customer payment). Note that if the customer does not pay the interest, the Account Manager can create the collection letter. Summary In the Sales training lesson, we have studied the following:
Источник: http://www.dynamicsaxtraining.com/fi...training/sales
__________________
Расскажите о новых и интересных блогах по Microsoft Dynamics, напишите личное сообщение администратору. |
|
|


 Линейный вид

